Pod Topology Spread Constraints - Controlling Where Your Pods Land
In Coming
Today I am back with a Kubernetes story.
So far we have looked at how to deploy with a Deployment, and how to auto scale the running pods with an HPA. Today let’s go one step further and look at Topology Spread Constraints, which let you squeeze more out of the resources on your nodes.
Once you apply a topology spread constraint, you can control how many pods live on each node that is currently running — or guarantee that pods get spread out evenly.
Let’s take a look!
Topology Spread Constraint
First — why would you even want a topology spread constraint?
Let’s walk through an example.
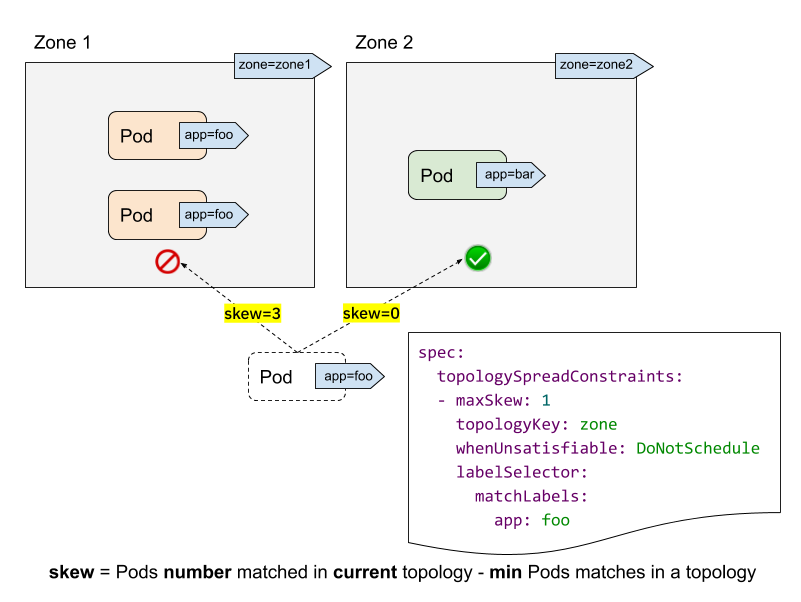 Topology spread constraint
Say we want to deploy a pod carrying the label app=foo onto some node.
Zone1 already has 2 pods running, and Zone2 has none.
In this situation we want to avoid pods piling up in one place. Without a topology spread constraint, there is no guarantee about where the new pod ends up.
So to guarantee that the new pod gets scheduled into Zone2, we add a topology spread constraint — and that is how we keep the pod counts under control.
1
2
3
4
5
6
7
8
9
10
apiVersion: v1
kind: Pod
metadata:
  name: example-pod
spec:
  topologySpreadConstraints:
  - maxSkew: <integer>
    topologyKey: <string>
    whenUnsatisfiable: <string>
    labelSelector: <object>
Here is what each of those settings means:
| Setting | Description | In the example above |
|---|---|---|
maxSkew | The upper bound on the allowed difference in pod counts | It is 1, so the maximum difference in the number of pods across nodes carrying the topology key must stay at 1 |
topologyKey | The key of the label attached to the node | It targets nodes carrying the label key zone |
whenUnsatisfiable | What to do when maxSkew cannot be satisfied | DoNotSchedule: do not schedule at all (default)ScheduleAnyway: ignore the maxSkew value and schedule with a strategy that minimizes the skew |
labelSelector | Which pods are being counted | It targets pods carrying the label app=foo |
So when every pod consumes roughly the same amount of resources, setting maxSkew to 1 is generally the way to get the most efficient use of the resources in the k8s cluster you are running.
The situation above is a simplified example, so let’s move on to a slightly more advanced one to really nail down the understanding.
Advance
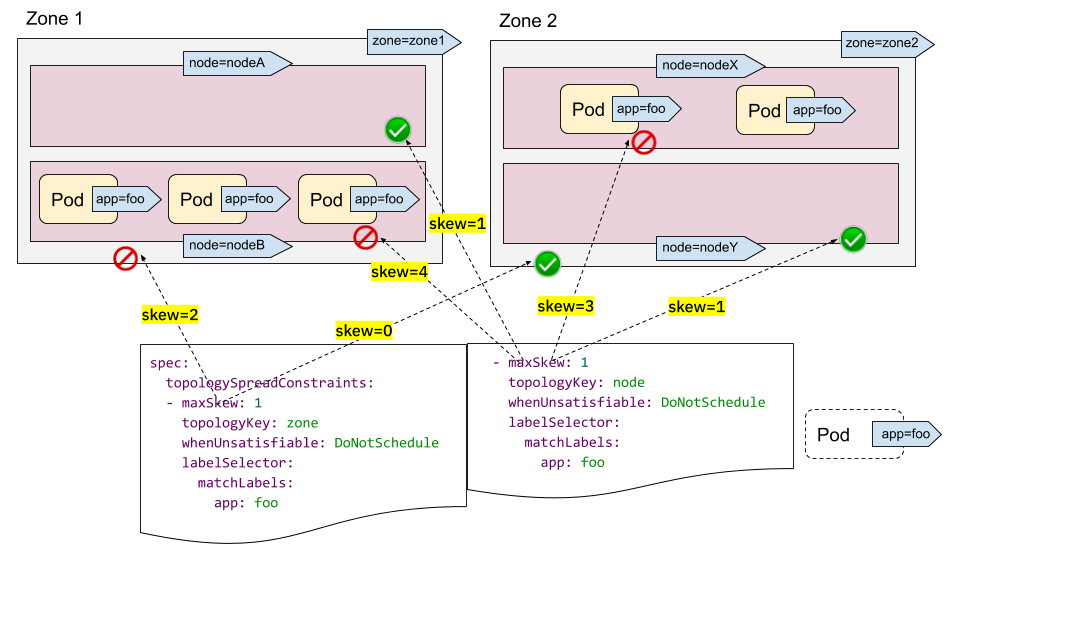 Two topology spread constraints
Let’s see how things behave in a (slightly) more complicated situation.
In the location called Zone1 there are 2 nodes, A and B, with 3 pods labeled app=foo deployed. In the location called Zone2 there are 2 nodes, X and Y, with 2 pods labeled app=foo deployed.
1
2
3
4
5
6
7
8
spec:
  topologySpreadConstraints:
  - maxSkew: 1
    topologyKey: zone
    whenUnsatisfiable: DoNotSchedule
    labelSelector:
      matchLabels:
        app: foo
A topologyKey based on zone compares zone1 against zone2.
- Deploy into zone1 → zone1[4], zone2[2], so the skew becomes 4-2=2 — violated.
- Deploy into zone2 → zone1[3], zone2[3], so the skew becomes 3-3=0 — satisfied.
So zone2 is unconditionally selected as the deployment target.
1
2
3
4
5
6
7
8
spec:
  topologySpreadConstraints:
  - maxSkew: 1
    topologyKey: node
    whenUnsatisfiable: DoNotSchedule
    labelSelector:
      matchLabels:
        app: foo
A topologyKey based on node compares nodeA, nodeB, nodeX and nodeY.
- Deploy into nodeA → nodeA[1], nodeB[3], nodeX[2], nodeY[0], so the difference between nodes gives a skew of 1 — satisfied.
- Deploy into nodeB → nodeA[0], nodeB[4], nodeX[2], nodeY[0], so the skew becomes 4 — violated.
- Deploy into nodeX → nodeA[0], nodeB[3], nodeX[3], nodeY[0], so the skew becomes 3 — violated.
- Deploy into nodeY → nodeA[0], nodeB[3], nodeX[2], nodeY[1], so the skew becomes 1 — satisfied.
So either nodeA or nodeY gets selected as the deployment target.
Putting it together, the target that satisfies both topologySpreadConstraints is nodeY in zone2 — and that is where the pod goes.
But what happens if the two topologySpreadConstraints have no intersection at all?
The pod simply cannot be deployed, and ends up in the Pending state.
In other words, you want to be a bit more careful when you use two or more topologySpreadConstraints.
Wrapping Up
Personally, I would rather avoid strategies that make topologySpreadConstraint complicated.
The more deployment settings you pile on, the harder it gets to reason about where things will actually land, and the more room there is for surprises. Solving the problem with the simplest possible configuration can be the wiser move.
Looked at another way, picking the ScheduleAnyway strategy for whenUnsatisfiable can be simpler — and smarter — to operate.
That said, this is just my personal take, so it is best to stay flexible and think about the configuration strategy that fits your own infrastructure conditions! :)
Let me wrap up with a short summary:
topologySpreadConstraintlets you decide where a pod gets deployed- the skew is calculated according to the
topologyKey labelSelectorpicks which pods are counted- set your
topologySpreadConstraintstrategy to match how things are actually running
Reference
</content> </invoke>